DeepShelf tutorials

From first install to closing the drawer.

Follow the complete store workflow using real DeepShelf screens: activate, load stock, sell, reconcile, and report.

6

Guides

27 min

Total time

3

Platforms

Lesson 01

Install and set up your store

Download the right build, activate your license, and create the first administrator account.
5 min
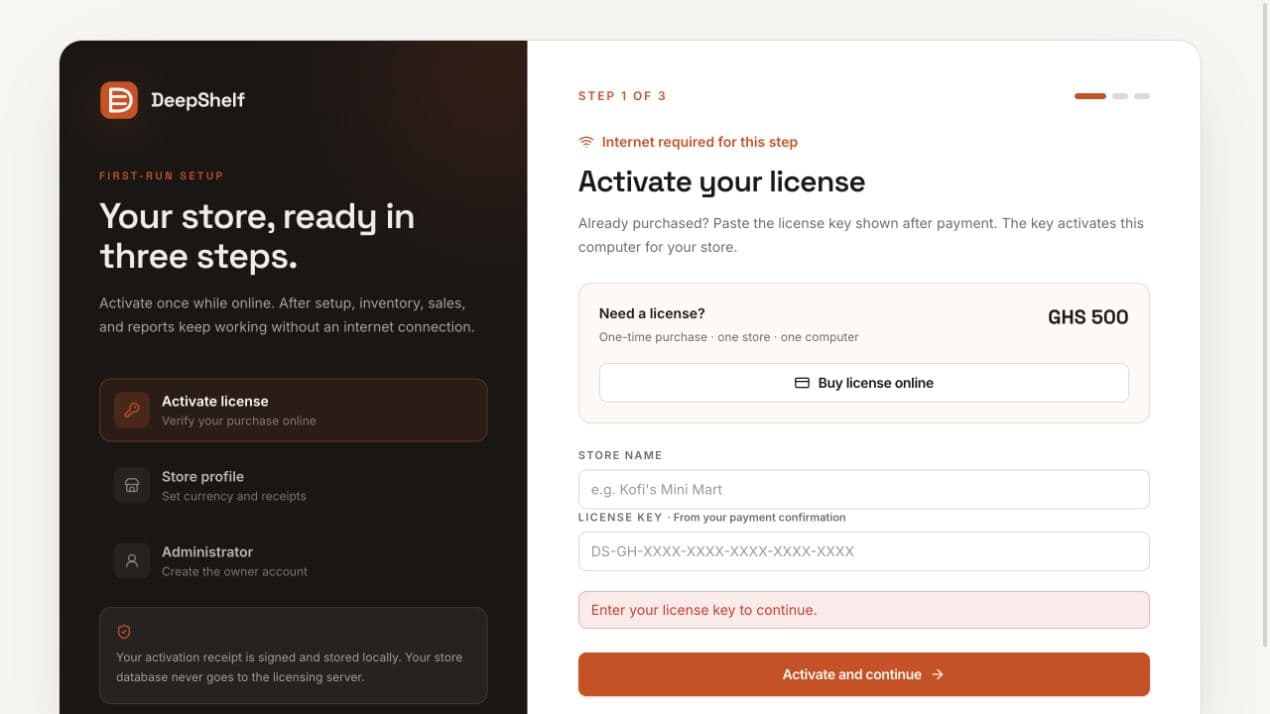
DeepShelf first-run setup screen showing license activation
Actual DeepShelf product screenDemo store · no customer data
  1. 1

    Open the download page and choose Windows, macOS Apple Silicon, macOS Intel, or Linux.

  2. 2

    Install the app. On macOS, drag DeepShelf into Applications. During the free preview, Control-click the app and choose Open the first time.

  3. 3

    Enter the store name and license key exactly as they appear on the payment confirmation, then select Activate and continue.

  4. 4

    Choose the store currency and receipt footer, then create the administrator account that will manage employees, reports, and settings.

Good to know: Internet is required for license activation. Inventory, checkout, reconciliation, and reports continue to work offline afterward.
Lesson 02

Read the dashboard

Start each day with a quick view of stock risks, recent sales, and today’s revenue.

3 min
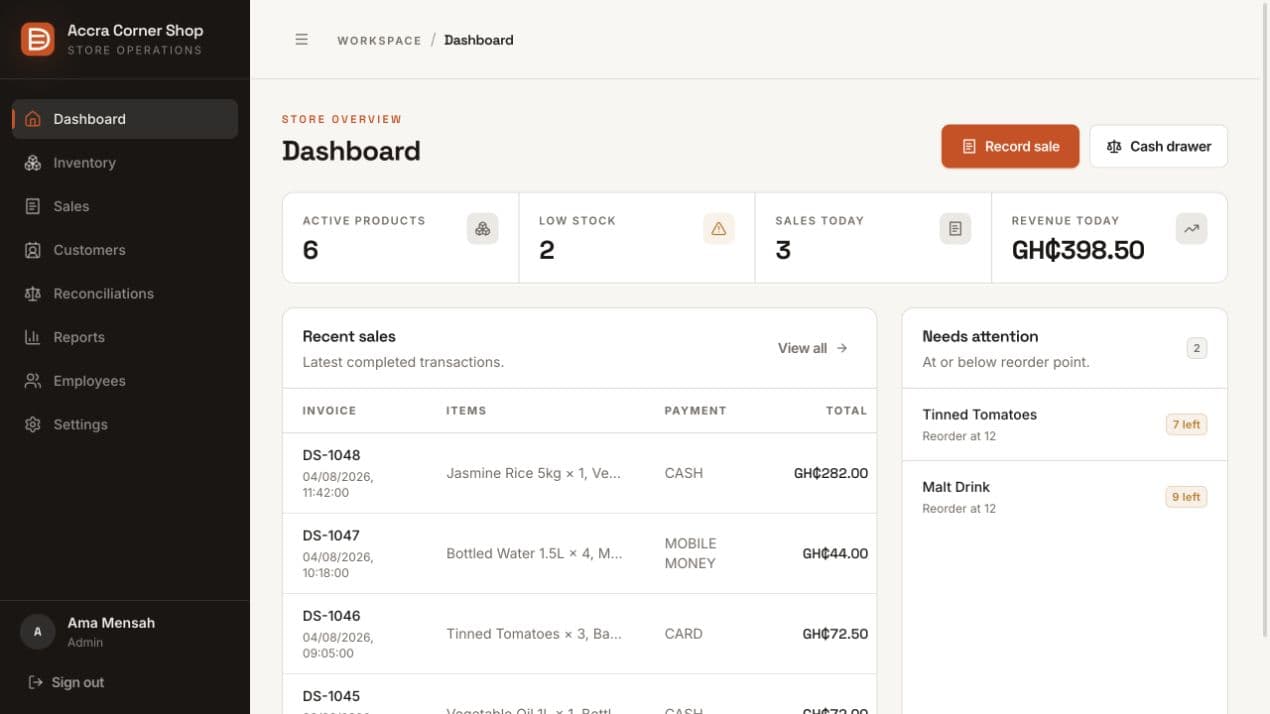
DeepShelf dashboard showing active products, low stock, revenue, and recent sales
Actual DeepShelf product screenDemo store · no customer data
  1. 1

    Use Active products and Low stock to understand what is ready to sell and what needs restocking.

  2. 2

    Check Sales today and Revenue today for a live summary of the current trading day.

  3. 3

    Review recent transactions below the summary. Select View all when you need filters or complete sale details.

  4. 4

    Use Record sale for checkout or Cash drawer to record starting cash and reconciliation activity.

Lesson 03

Add products and opening stock

Build the catalogue, set selling prices, and make low-stock warnings useful from day one.

6 min
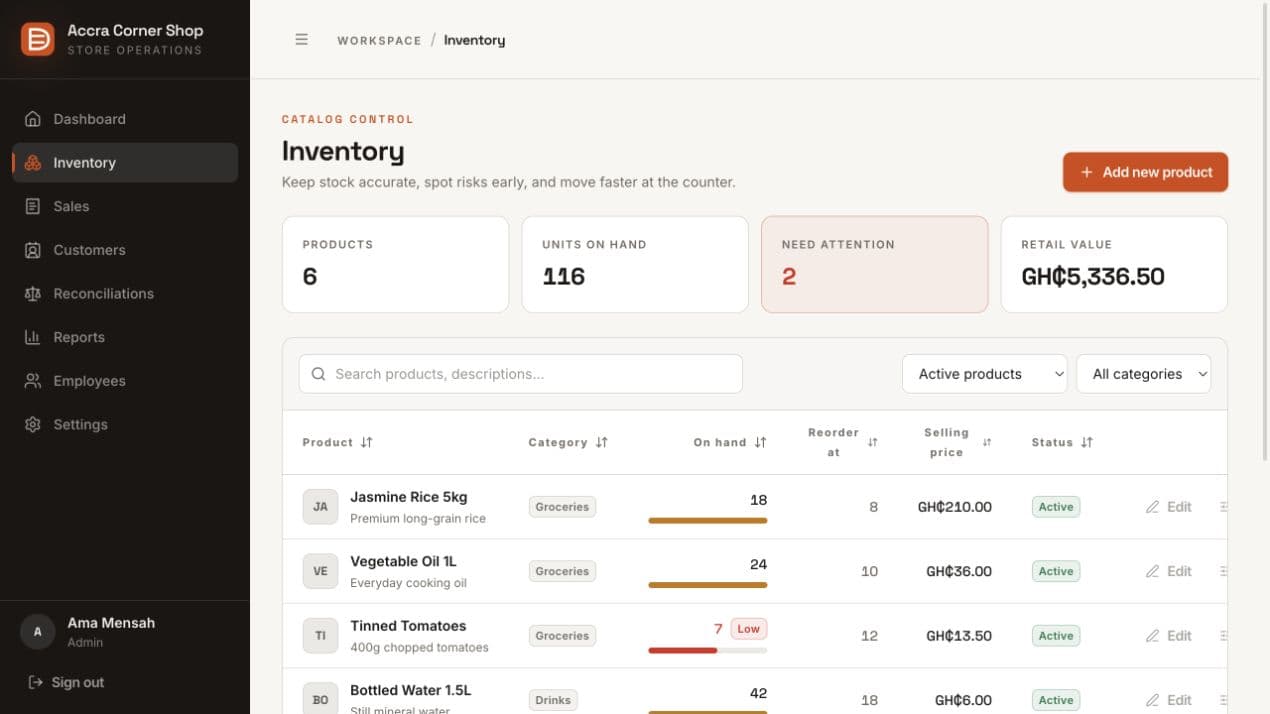
DeepShelf inventory screen showing products, quantities, reorder levels, and prices
Actual DeepShelf product screenDemo store · no customer data
  1. 1

    Open Inventory, then select Add new product.

  2. 2

    Enter the product name, category, barcode if available, cost price, selling price, and starting quantity.

  3. 3

    Set Reorder at to the lowest acceptable quantity. DeepShelf flags the item when stock reaches that level.

  4. 4

    For later deliveries, damages, returns, or corrections, use the product’s stock adjustment action and enter a clear reason.

Good to know: Managers and administrators can manage the catalogue. Every stock adjustment is recorded so quantity changes remain explainable.

Lesson 04

Record your first sale

Search or scan products, confirm the cart, and record how the customer paid.

4 min
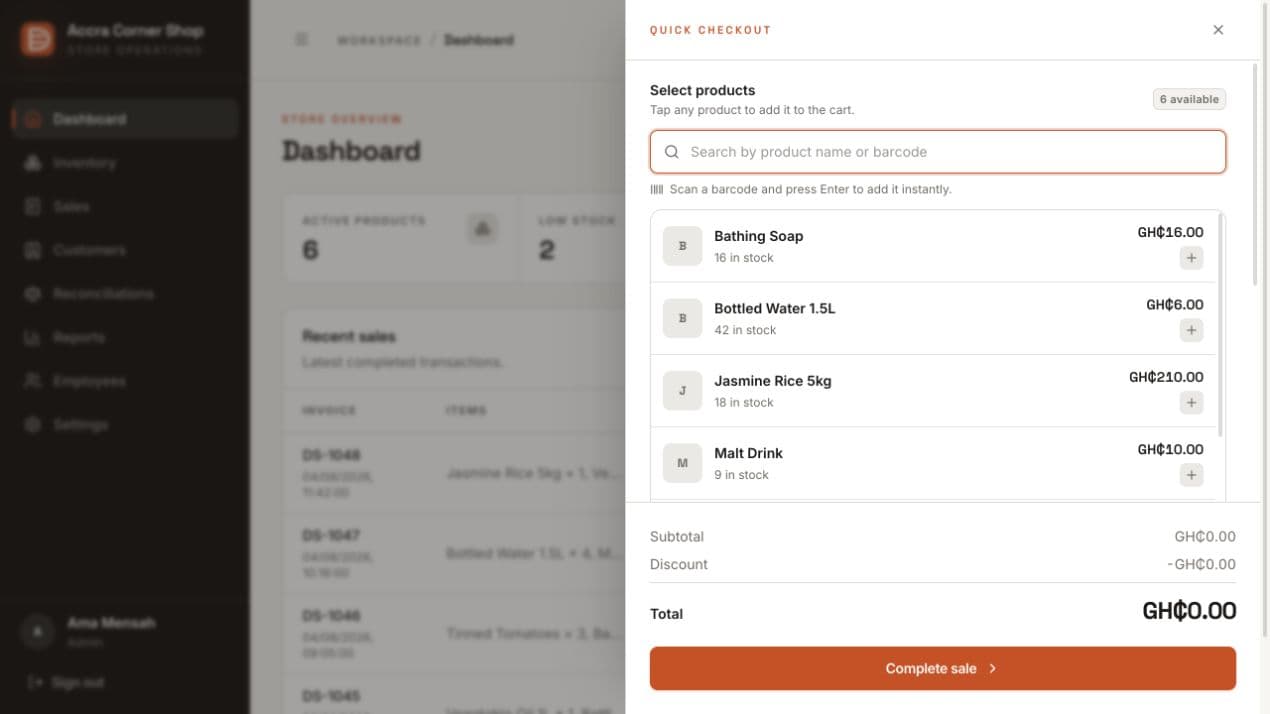
DeepShelf quick checkout drawer with searchable products and cart totals
Actual DeepShelf product screenDemo store · no customer data
  1. 1

    From the dashboard, select Record sale.

  2. 2

    Search by product name or scan a barcode and press Enter. Select the plus button to add an item manually.

  3. 3

    Review quantities, apply any discount, and attach a customer profile when you want to track purchase history.

  4. 4

    Choose cash or mobile money, then select Complete sale. DeepShelf records the transaction and deducts stock immediately.

Lesson 05

Reconcile the cash drawer

Track drawer movements during a shift and compare counted cash with the expected amount.

5 min
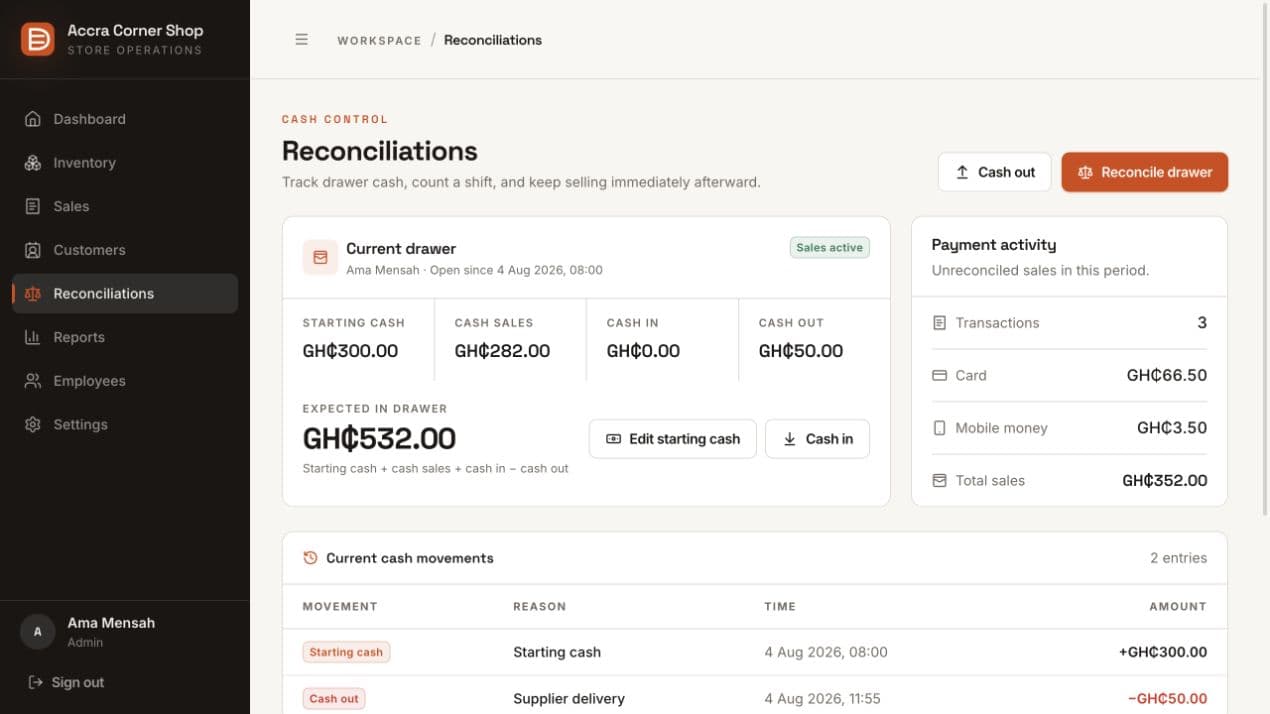
DeepShelf reconciliation screen showing expected cash and payment activity
Actual DeepShelf product screenDemo store · no customer data
  1. 1

    At the beginning of a shift, open Reconciliations and set the starting cash in the drawer.

  2. 2

    Use Cash in and Cash out whenever money moves without being part of a sale. Always enter the reason.

  3. 3

    At shift close, select Reconcile drawer and enter the physical cash count.

  4. 4

    Review the variance and saved reconciliation. Staff see their own history; managers and administrators can review all employees.

Good to know: The cashier responsible for the drawer should submit the count. Management should review unexplained variances rather than performing every count themselves.

Lesson 06

Review and export reports

Understand revenue, profit, product performance, and inventory health for any selected period.

4 min
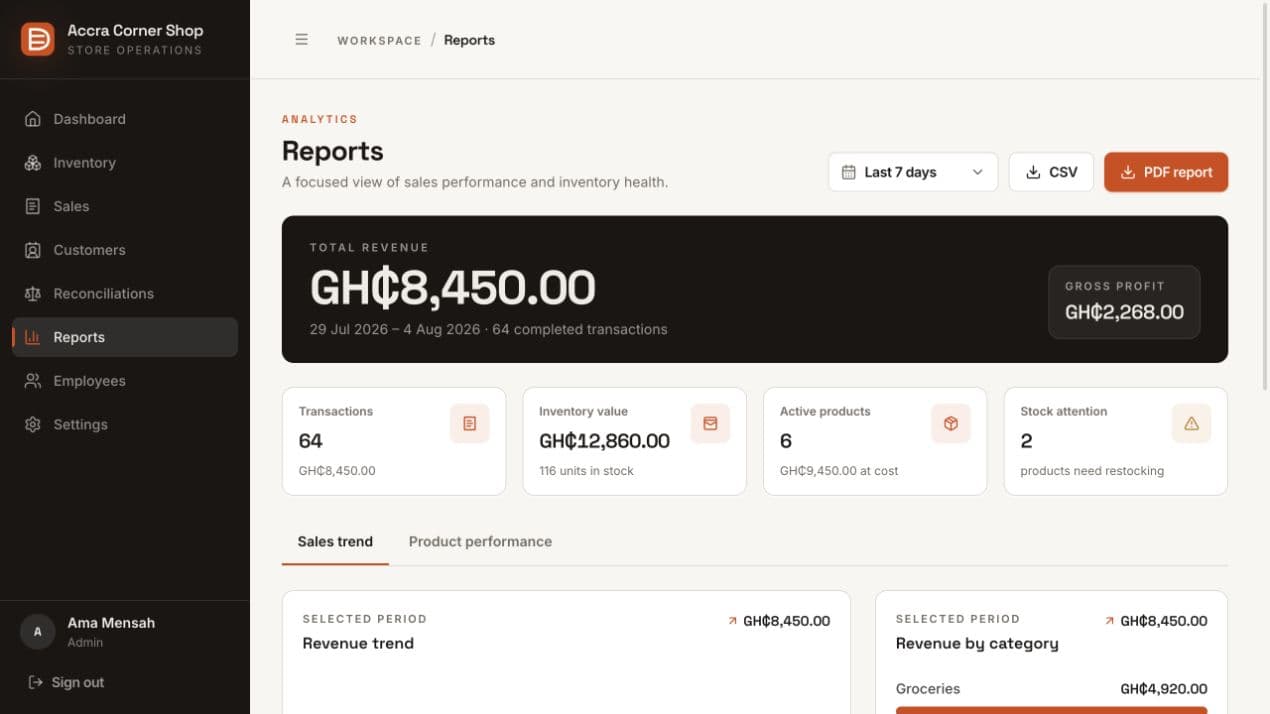
DeepShelf reports screen showing revenue, gross profit, inventory value, and sales charts
Actual DeepShelf product screenDemo store · no customer data
  1. 1

    Open Reports and choose Today, Last 7 days, Last 30 days, or a custom date range.

  2. 2

    Review total revenue, gross profit, transaction count, inventory value, and items that need restocking.

  3. 3

    Switch between sales trends and product performance to identify busy periods and best sellers.

  4. 4

    Select CSV for spreadsheet analysis or PDF report for a shareable summary.

Ready to begin?

Put the guide beside the till and set up as you go.

Download the build for your computer, activate once, and keep this page open while you load your first products.